Five Wats

Posted: September 14, 2018 in Exercise, Fitness, Health
Tags: ,

In an office environment, most people spend hours in a seated position in front of a computer screen. Repetitive activities, such as typing for long periods of time in a slouched position, may negatively impact posture and mobility, potentially leading to pain. One approach for improving back health and reducing the discomfort associated with repetitive workplace activities is to promote mobility, muscular balance and strength for optimal movement, posture and wellness.

The following five exercises can be easily incorporated into your workday, require little time and target common problems seen in the workplace. Get up and start moving!

Scapular Wall-Slides for Back, Shoulder and Neck Pain

Recommendation: 1-3 sets of 10 repetitions, twice per day

Starting position: Stand with your feet hip-to-shoulder width apart in a quarter squat while pressing your back and head flat against a wall. Attempt to place the arms against (or as close to as possible on) the wall at a 90-degree angle while keeping the back against the wall.

Upward phase:  While maintaining the starting position, actively slide the arms directly up the wall without shrugging.

Downward phase: While maintaining the starting position, actively slide the arms directly down the wall to the arm starting position, without shrugging the shoulders. Tuck your chin while maintaining your head on the wall to prevent shrugging. This movement should be felt in the middle of the back.

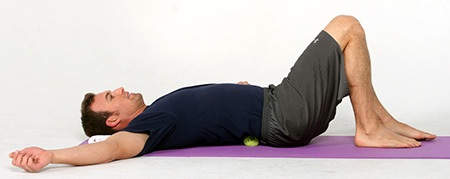
Half-kneeling Hip-flexor Stretch

Recommendation: One set of 30 seconds to two minutes on each leg, three times per day

Starting position: Place the left knee down (on a pad) at a 90-degree angle, directly underneath the left hip and shoulder. Step forward with the left foot and position the knee at 90-degree angle. Place the hands on the hips or continue to perform work tasks, such as typing.

Static phase: Actively squeeze the right glutes to create a static contraction and hold it for up to two minutes without arching the lower back.

Release phase: Stop contracting and release. This stretch should be felt in the right hip flexors (the anterior segment of the right leg). Repeat the stretch on the opposite leg

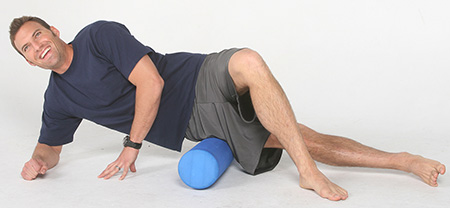
Lacrosse Ball Myofascial Release of the Forearms for Hand, Wrist, and Elbow Pain

Recommendation: 1-2 sets of 30 seconds on each forearm, twice per day

Starting position: While seated, reach one arm in front of you with the palm up. Place a lacrosse ball on the desk underneath the arm, directly below the elbow.

Upward and downward phases: While applying tolerable pressure, slowly roll the ball upward and downward along the forearm extensors in a slow-paced fashion. Make sure to roll out the entire length of the forearm before concentrating on the area(s) that appear to be the most sensitive. Repeat on the other arm.

External Rotation of the Shoulder

Recommendation: 1-3 sets of 10 repetitions, twice per day

Starting position: Stand with feet hip-to-shoulder width apart. Bring the elbows against the sides of the body with the arms at a 90-degree angle.

Concentric phase: Slowly externally rotate both shoulders, while maintaining contact of the elbows with the sides of the body and squeezing the shoulder blades toward each other and slightly down.

Eccentric phase: Return to the starting position with control.

Banded (Seated) Hip Abduction

Recommendation: 1-3 sets of 10-15 repetitions, twice per day

Starting position: While seated upright, place the feet on the floor, hip-width apart, and place a mini band around the knees and the hands on the sides of the chair.

Concentric phase: Push both knees outward (as if you’re trying to break the mini band), while keeping your feet on the floor.

Eccentric phase: Allow the knees to return to the starting position with control, keeping tension on the band the entire time.

Remember, whether you’re in the office or at home, get up and move often! Use these strategies throughout the workday to improve posture and mobility, while decreasing the discomfort associated with sitting.

AUTHOR

Matthew Cain

Contributor

Matthew Cain is an Assistant Professor of Exercise Science at San Diego Miramar College. He is currently working towards his PhD in Exercise Science – Health and Human Performance at Concordia University Chicago. Matthew has a MS in Exercise Science and Sports Management from California Baptist University. Prior to San Diego Miramar College, Matthew was a full-time faculty member at CSUDH in the Department of Kinesiology and an adjunct professor at El Camino College. He has been published in the Strength and Conditioning Journal, International Journal of Sports Physical Therapy, and Journal of Canadian Chiropractic Association. He is an ACE Fitness Nutrition Specialist.

READ MORE

Get in the Know

Stay connected with us to get the latest health and fitness news, innovative workouts, healthy recipes and wellness tips.

Enter your email

Yes! I’d like to receive the latest news and updates from ACE.

SUBSCRIBE

search

TRENDING

What is cross training and why is it important?

Is it ever okay for your knees to extend beyond your toes while doing squats or lunges?

How to Eat and Train for an Endomorph Body Type

Weight Training For Weight Loss

5 Chest Stretch Variations

How to Use Blocks to Enhance Your Yoga Poses

LOAD PREVIOUS ARTICLE

ABOUT ACE

PROFESSIONALS

CERTIFICATIONS

RESOURCES

LEGAL

CONTACT US

4851 Paramount Drive

San Diego, California 92123

1 (888) 825-3636

Facebook

Twitter

Instagram

Pinterest

LinkedIn

Copyright© The American Council on Exercise. All Rights Reserved.

llwww.acefitness.org/education-and-resources/lifestyle/blog/7101/five-ways-to-improve-posture-and-mobility-at-the-office

Mindsets

Posted: August 20, 2018 in Fitness

A great poster I saw about #mindsets Mental aspect of how you view things in life will effect your success or outcome tremendously! #willbfitnc #cltfitness #health #fitness #success #motivation

It can be hard not to overeat. You eat a healthy meal at home, think you’re doing well, then you head out (to almost any destination) and are surrounded by junk food. You get hungry, and pretty soon you’re at the local burger joint, diet forgotten.

— Read on blog.myfitnesspal.com/6-appetite-control-strategies-that-helped-me-stop-overeating/

It’s not uncommon to find multivitamins or individual vitamin supplements that migrated to the back of the cabinet and are now past their expiration date. Although it may not be dangerous to take expired supplements, they won’t be as strong as when you first bought them. The FDA does not require that supplements have expiration dates, but most reputable vitamin companies will try to determine when the supplement loses its potency.

Potency

The main issue with taking vitamins after their expiration date is that they lose their potency and therefore their effectiveness. Generally, an expiration date indicates the last date of their highest level of potency. You are likely taking a vitamin to get some health benefits, so you want your vitamins to be as effectively potent as possible. If a label says it contains a certain amount of a vitamin, after a year or two there may only be half as much because it breaks down over time. It is difficult to quantify how much is degraded, therefore, its best to just throw away expired vitamins and supplements.

Side Effects

Expired vitamins do not go bad like food does and they do not turn into poison or toxins. Many expiration dates are set very conservatively because it benefits the supplement company. It is not dangerous to take expired vitamins, but as mentioned, the vitamins will lose their potency. There have been no documented cases of illness or death from expired vitamins, but throw the supplements away if they have an off smell or have changed color.

Proper Storage

If not stored properly, vitamins will lose their potency even faster. Exposure to heat, light, and air can cause vitamins to degrade faster. Store the vitamins in their original containers in a cool, dry place. Do not allow the vitamins to be exposed to heat or light. Many of the B-vitamins are very sensitive to light exposure. Some supplements require refrigeration or other special storage, so always follow the directions on the bottle.

Disposal of Vitamins

If your vitamins are expired and you want to toss them, get rid of them properly. It is important not to flush them in the toilet or throw them into the trash. Putting them into the water supply can possibly hurt other people and organisms. If an animal or child gets into the trash and accidentally consumes the vitamins, they could get sick. It is better to mix the vitamins with used coffee grounds or cat litter and then put that into a container with a lid.

http://healthyeating.sfgate.com/vitamins-expire-bad-7219.html

 Anyone who’s ever suffered from sciatic nerve pain knows it’s a real pain in the butt—literally. And If you’re dealing with a flare up, these simple moves can help by targeting one of the most common causes: Piriformis Syndrome. “This happens when the piriformis, a small muscle deep in your hips, becomes tight and compresses the sciatic nerve, often leading to burning pain and numbness on one side of your butt and down the back of your leg,” says Chicago-based physical therapist David Reavy. And it’s not just the piriformis that needs a little TLC: Tight hip flexors compound the problem by making the piriformis muscles work harder, causing it to tighten and pinch the sciatic nerve. “That’s why it’s so important to stretch, stretch, stretch the hips—once you release the piriformis muscle, you take the pressure off the nerve, which can lessen the pain and keep it from coming back. Foam rolling the hip rotator can also help to release some of that tension and minimize pain.”sciatic nerve pain

Start by doing these moves at least 3 times a week. Once you’ve gotten rid of the pain, keep doing the exercises at least once a week to keep it from coming back.Reclined Pigeon With Prep Stretch

 Lie face-down and bend your knees so your heels are right under your knees. Take your hands to the front of your thighs, slide them to the root of the leg where it meets your pelvis, and push the heel of each hand into the bottom of the leg bone. Lift your right leg up and cross over the left. With a small curve in your back, grab the back of your thighs and push your legs into your hands, away from your face. Hold for several deep breaths and then repeat on the other side.

Reclining Cow’s Face Pose

 Lie face-up and cross your left leg over your right. Raise both legs off the floor, flex both feet, and reach up for the outer ankles, hugging your legs toward your belly. Spread your toes, keep your feet flexed, and hold your legs in for several breaths. Slowly switch to the other side and repeat.

Low Lunge

Start in a runner’s lunge, right leg forward with knee over ankle and left knee on ground with top of your foot flat on the mat. Slowly lift torso and rest hands lightly on right thigh. Lean hips forward slightly, keeping right knee behind toes, and feel the stretch in the left hip flexor. Hold here, or for a deeper stretch, raise arms overhead, biceps by ears. Hold for at least 30 seconds, then repeat on opposite side.

Pigeon

Start in a runner’s lunge with right leg forward, right knee over right ankle and back leg straight. Walk right foot over toward left hand, then drop right shin and thigh to the floor, making sure to keep right knee in line with right hip. Allow left leg to rest on the floor with top of left foot facing down. Take a moment to square your hips to the front of the room. Hold here, or hinge at hips and lower torso toward floor, allowing head to rest on forearms. Hold for at least 30 seconds, then repeat on opposite side. You want to feel a moderate stretch in the outside of the right thigh, but if this pose hurts your knees or feels too uncomfortable, stick with thread the needle.

Frog Pose

If most inner-thigh openers feel too easy (and your ankles and knees are injury-free), try Frog Pose. Get down on all fours, with palms on the floor and your knees on blankets or a mat (roll your mat lengthwise, like a tortilla, and place it under your knees for more comfort). Slowly widen your knees until you feel a comfortable stretch in your inner thighs, keeping the inside of each calf and foot in contact with the floor.  Make sure to keep your ankles in line with your knees. Lower down to your forearms. Stay here for at least 30 seconds.

Foam Roll for Hip Rotator

Sit on the foam roller with your knees bent, feet flat on the floor. Lean your torso back and place right hand on the floor, shifting weight into right hip and crossing right ankle over left thigh. Place your left hand on your left thigh. Use your supporting foot and hand to roll from the bottom of the glutes to the pelvic bone. Continue rolling back and forth for 30 to 60 seconds.

(Continue)

http://www.prevention.com/fitness/yoga/stretches-sciatic-nerve-pain?sa=X&ved=0ahUKEwiky8zKtOPPAhXIyyYKHU39B8wQ9QEIDjAA

The Physiology of Fat Loss

by: Len Kravitz, PhD , Christine Mermier, PhD and Mike Deyhle

From the fat cell to the fat furnace, find out exactly what causes the body to burn fat.

Fat may seem like the enemy of civilized people—especially sedentary ones. Yet we cannot live without it.Fat plays a key role in the structure and flexibility of cell membranes, and it helps regulate the movement of substances through those membranes. Special types of fat, known as eicosanoids, send hormone-like signals that exert intricate control over many bodily systems, mostly those affecting inflammation or immune function.

Of course, the best-known function of fat is as an energy reserve. Fat has more than twice the energy-storage capacity of carbohydrate (9 calories per gram vs. 4 calories per gram). It has been estimated that lean adult men store about 131,000 calories in fat (Horowitz & Klein 2000), enough energy to keep the average person alive for about 65 days.

For fitness professionals, the prime concern arises when the body’s fat-storage function works too well, hoarding unwanted fat that makes people unhealthy and self-conscious about their appearance. Understanding how fat travels through the body can help personal trainers work with clients to reduce excess body fat and improve athletic performance.

The Journey of a Fatty Acid to Muscle

THE ADIPOCYTE

p38 ImageFat resides primarily in designated fat-storage cells called adipocytes. Most adipocytes are just under the skin (subcutaneous fat) and in regions surrounding (and protecting) vital organs (visceral fat). Nearly all fat in adipocytes exists in the form of triacylglycerols (TAGs or triglycerides). Each TAG consists of a backbone (glycerol) with three fatty-acid tails (see Figure 1).

Depending on energy supply and demand, adipocytes can either store fat from the blood or release fat back to the blood. After we eat, when the energy supply is high, the hormone insulin keeps fatty acids inside the adipocytes (Duncan et al. 2007). After a few hours of fasting or (especially) during exercise, insulin levels tend to drop (see Figure 2), while levels of other hormones—such as epinephrine (adrenaline)—increase.

When epinephrine binds to adipocytes, TAG stores go through a process called lipolysis (Duncan et al. 2007), which separates fatty acids from their glycerol backbone. After lipolysis, fatty acids and glycerol can leave the adipocytes and enter the blood.

p39 ImageFatty Acids in the Blood

Because fat does not easily dissolve in water, it needs a carrier protein to keep it evenly suspended in the water-based environment of the blood. The primary protein carrier for fat in the blood is albumin (Holloway et. al. 2008). One albumin protein can carry multiple fatty acids through the blood to muscle cells (Horowitz & Klein 2000). In the very small blood vessels (capillaries) surrounding the muscle, fatty acids can be removed from albumin and taken into the muscle (Holloway et al. 2008).

Fatty Acids Going From the Blood Into Muscle

Fatty acids must cross two barriers to get from the blood into the muscle. The first is the cell lining of the capillary (called the endothelium), and the second is the muscle-cell membrane (known as the sarcolemma). Fatty-acid movement across these barriers was once thought to be extremely rapid and unregulated (Holloway et al. 2008). More recent research has shown that this process is not nearly as fast as once thought and that the presence of special binding proteins is required at the endothelium and sarcolemma for fatty acids to pass through (Holloway et al. 2008). Two proteins that are important for fatty-acid transport into the muscle cells are FAT/CD36 and FABPpm.

Two Fates of Fat Inside Muscle

Once fat is inside the muscle, a molecule called coenzyme A (CoA) is added to the fatty acids (Holloway et al. 2008). CoA is a transport protein that maintains the inward flow of fatty acids entering the muscle and prepares the fatty acid for one of two fates:

  • oxidation (in which electrons are removed from a molecule) to produce energy or
  • storage within the muscle (Holloway et al. 2008; Shaw, Clark & Wagenmakers 2010)

The majority (80%) of fatty acids entering the muscle during exercise are oxidized for energy, while most fatty acids entering the muscle after a meal are repackaged into TAGs and stored in the muscle in lipid droplets (Shaw, Clark & Wagenmakers, 2010). Fatty acids stored in muscle are called intramyocellular triacylglycerols (IMTAGs) or intramuscular fat.

There are two to three times more IMTAGs stored in slow twitch muscle fibers (the slow oxidative fibers) than there are in fast-twitch muscle fibers (Shaw, Clark & Wagenmakers 2010). Shaw and colleagues note that even though this IMTAG supply makes up only a fraction (1%–2%) of the total fat stores within the body, it is of great interest to exercise physiologists because it is a metabolically active fatty-acid substrate especially used during periods of increased energy expenditure, such as endurance exercise.

Fatty Acids Burned for Energy

Fatty acids burned for energy (oxidized) in the muscle can come either directly from the blood or from IMTAG stores. For fatty acids to be oxidized, they must be transported into the cells’ mitochondria (see Figure 3). A mitochondrion is an organelle that functions like a cellular power plant; it processes fatty acids (and other fuels) to create a readily usable energy currency (ATP) in order to meet the energy needs of a muscle cell.

Most fatty acids are transported into the mitochondria via the carnitine shuttle (Holloway et al. 2008), which uses two enzymes and carnitine (an amino acid-like molecule) to do the transporting. One of these enzymes is called carnitine palmitoyltransferase I (CPT1). CPT1 may work with one of the same proteins (FAT/CD36) used to bring fatty acids into the muscle cells from the blood (Holloway et al. 2008). Once inside the mitochondria, fatty acids are broken down through several enzymatic pathways—including beta-oxidation, the tricarboxylic acid (TCA) cycle and the electron transport chain—to produce ATP.

Fatty-Acid Oxidation During a Single Bout of Exercise

At the start of exercise, more blood flows to adipose tissue and muscle (Horowitz & Klein 2000), releasing more fatty acids from adipose tissue and delivering more fatty acids to the muscle.

Exercise intensity has a great impact on fat oxidation.We burn the most fat when exercising at low to moderate intensity—that is, when oxygen consumption is between 25% and 60% of maximum (Horowitz & Klein 2000). At very low exercise intensities (25% VO2max), most of the fatty acids used during exercise come from the blood (Achten & Jeukendrup 2004). As exercise increases to moderate intensity (around 60% of VO2max), most of the fatty acids oxidized appear to come from IMTAG stores (Horowitz & Klein 2000).

p39 ImageAt higher exercise intensities (>70% VO2max), total fat oxidation falls below the levels observed at moderate intensity (Horowitz & Klein 2000). This reduction in fatty-acid oxidation is coupled with an increase in carbohydrate breakdown to meet the energy demands of the exercise (Horowitz & Klein 2000).

We often overemphasize the fatty-acid contribution to calories burned during a bout of exercise. It’s also important to consider recovery from a bout of exercise, as well as training adaptations to repeated bouts, if you’re helping clients meet their fat-loss goals.

(Continue)

ACE – ProSource: October 2014 – Build Strong Glutes and a Pain-free Lower Back.

By Justin Price

There are two things many of our clients have in common: They want to have nice-looking buns and, at some point in their lives, they will experience lower-back pain. The good news is that developing strong, shapely glutes can contribute to a pain-free lower back. In this article, you’ll learn why deconditioned and/or dysfunctional gluteal muscles and lower-back pain often go hand-in-hand. You’ll also learn which exercises build strong glutes and can help keep lower-back pain at bay.

What Causes Back Pain

Many people mistakenly believe that lower-back pain is caused by a problem with their lower back. This is understandable given that movements of daily life, sports and most weight-bearing exercise modalities require the spine to move forward, backward, side to side and in rotation (McGill, 2002). When you lean forward, for example, the spine rounds/flexes. When walking and running, it moves from side to side as you transfer weight from one foot to the other. When performing sporting movements like golf, tennis and baseball, the spine must rotate to achieve the desired motion (Chasan, 2002).

However, all these movements of the spine require other parts of the body to work as well. When bending forward to pick a weight up from the ground, for example, the ankles, knees and hips should also bend to help lower the torso. Similarly, as the spine moves from side to side during walking, the legs and hips should also move from side to side (i.e., adduct and abduct) to help provide a good base of support for the spine as it moves. Rotational movements of the spine should be accompanied by rotational movements in the legs and hips so the tremendous force created by swinging a tennis racket or golf club, for example, is dissipated throughout the entire body. When actions of the spine are not accompanied by correct movement in the rest of the body, the spine and its surrounding muscles (e.g., the lower back) have to take up the slack and may become overworked and injured.

How Strong Glutes Can Help Prevent Back Pain

The gluteal complex of muscles (i.e., gluteus maximus, medius and minimus) plays a key role in helping take stress off the spine during multiplanar movements. That’s because these muscles help control movements of the torso, pelvis, hips and legs. When you bend forward or squat, for example, your hips should bend backward to counterbalance the forward motion of your upper body to help you stay upright (Figure 1). The gluteus maximus works to decelerate flexion of your hips to help counteract the downward pull of gravity and prevent your lumbar spine from over-rounding forward (Price and Bratcher, 2010). If your glutes are not strong enough to fully engage when your hips bend backward, your spine must round forward excessively to lower your arms to the ground (Figure 2).

Similarly, much of the rotational movement stress experienced by the spine during sporting activities is moderated by the gluteus maximus muscle. When the spine rotates over the leg on one side of the body (e.g., when taking a backswing or follow through in golf, tennis or baseball), the hip and leg should also rotate to take stress off the lower back (Figure 3). Because the gluteus maximus muscle attaches to the structures of spine and pelvis and to the leg, rotation of the hip and leg should engage and lengthen this muscle, thus helping to decelerate rotation of the torso (Golding and Golding, 2003). If the gluteus maximus muscle is not working properly, stress from rotational movements is instead transferred to the lumbar spine and may manifest as pain in the lower back.

Side-to-side movement stress to the spine is moderated by the smaller muscles of the gluteal complex—the gluteus medius and minimus (Dimon and Qualter, 2008). As the spine moves from left to right as a person takes alternating steps when walking and running, the pelvis should also move from side to side (Figure 4). This shifting motion of the pelvis with the torso is decelerated by the gluteus medius and minimus because of their attachments from the pelvis to the side of the hip and leg. When they are healthy and functional they act as a brake for the lumbar spine, protecting it from excessive movement and stress. If they are not working correctly, pain may manifest in the hips and lower back.

How to Build Strong Glutes and a Pain-free Lower Back

As you have seen, correct functioning of the gluteal complex of muscles can help protect the structures of the lumbar spine as it moves during multiple planes of motion. However, before you begin overloading these muscles in an attempt to build strong glutes and a pain-free back, it is extremely important to adequately prepare them so as not to injure your lower back (Price and Bratcher, 2010). The following “warm up and wake up” series of self-myofascial release exercises and neuromuscular activation techniques will help ensure your gluteal muscles are working correctly and can protect your lower back as you move through various ranges of motion in the glute-strengthening program that follows.

Warm-up Exercises

For gluteal muscles to be flexible enough to lengthen effectively and decelerate movements of the pelvis, hips and spine, have your clients perform some self-myofascial release techniques on the muscles of the glutes and lower back prior to exercising. This will ensure the tissues are warm and mobile and can move in all three planes of motion.

Tennis Ball on the Butt

Massaging the gluteal complex of muscles before working out can help promote better movement of the pelvis, hips and legs, and ensure you get the most out of the strengthening exercises that follow.

Have your client to lie on his or her back with the knees bent. Place a tennis ball under the right side of the butt and scoot the body up and down and from side to side to move the ball to any sore spots, from the base of the spine all the way out to the side of the leg. You can progress this exercise by coaching your client to place the right ankle on the left knee. Place a rolled-up towel under the left hip to help keep the pelvis level. Roll out each buttock for one to two minutes. While a tennis ball is the easiest piece of equipment to purchase and use, a foam roller can also be used to massage the gluteal complex.

Tennis Ball on Lower Back

The gluteus maximus muscle ties into the fascia of the lower back (i.e., thoracolumbar fascia). Therefore, massaging the muscles on either side of the lumbar spine is important before performing glute-strengthening exercises.

Instruct your client to lie on his or her back with the knees bent. Place a tennis ball under the right side of the lower back (away from the spine itself) and scoot the body to move the ball to any sore spots between the bottom of the rib cage and the top of the hip. (Note: Do not place the tennis ball directly under the bottom two ribs. These are “floating ribs,” which do not attach to the sternum at the front of the rib cage.) Massage the area on each side of the spine for one to two minutes.

Foam Roller on Side of Thigh

The iliotibial band on the side of the thigh attaches the gluteus maximus muscle to the lower leg. Increasing blood supply to this structure will encourage correct movement of the hip and leg.

Instruct your client to place a foam roller beneath and perpendicular to the right leg, which is extended, and to balance the body on the right elbow and the left foot. Roll the leg up and down over the roller and pause on any sore spots. If your client has shoulder problems, or finds it difficult to balance, instruct him or her to lie on the ground with the head supported by a pillow, and place a tennis ball under the outside of the thigh. Perform this exercise for one to two minutes on each side.

Wake-up Exercises

People with lower-back problems typically have difficulty activating their glutes correctly. The following isometric and/or single-joint neuromuscular-activation exercises for the gluteus maximus, minimus and medius ensure these muscles are receiving correct input from the nervous system before you load them up with dynamic, multiplanar strengthening exercises.

(Continue)

Three Major Types of Speed Workouts

Lady Doing Speed Work in the Woods


Fartlek Workouts are not only fun to say out loud, but they’re fun to run. Fartlek is Swedish for “speed play,” and that is exactly what it’s all about. Unlike tempo and interval work, fartlek is unstructured and alternates moderate-to-hard efforts with easy throughout. After a warmup, you play with speed by running at faster efforts for short periods of time (to that tree, to the sign) followed by easy-effort running to recover. It’s fun in a group setting as you can alternate the leader and mix up the pace and time. And in doing so, you reap the mental benefits of being pushed by your buddies through an unpredictable workout. The goal is to keep it free-flowing so you’re untethered to the watch or a plan, and to run at harder efforts but not a specific pace.

Bennies = Stress-free workout that improves mind-body awareness, mental strength, and stamina.

Tempo Workouts are like an Oreo cookie, with the warmup and cooldown as the cookie, and a run at an effort at or slightly above your anaerobic threshold (the place where your body shifts to using more glycogen for energy) as the filling. This is the effort level just outside your comfort zone—you can hear your breathing, but you’re not gasping for air. If you can talk easily, you’re not in the tempo zone, and if you can’t talk at all, you’re above the zone. It should be at an effort somewhere in the middle, so you can talk in broken words. Pace is not an effective means for running a tempo workout, as there are many variables that can affect pace including heat, wind, fatigue, and terrain. Learn how to find your threshold and run a tempo workout that is spot on every time here.

Bennies = Increased lactate threshold to run faster at easier effort levels. Improves focus, race simulation, and mental strength.

Interval Workouts are short, intense efforts followed by equal or slightly longer recovery time. For example, after a warmup, run two minutes at a hard effort, followed by two to three minutes of easy jogging or walking to catch your breath. Unlike tempo workouts, you’re running above your red line and at an effort where you are reaching hard for air and counting the seconds until you can stop—a controlled fast effort followed by a truly easy jog. The secret is in the recovery as patience and discipline while you’re running easy allows you to run the next interval strong and finish the entire workout fatigued but not completely spent. Just like rest, your body adapts and gets stronger in the recovery mode.

Bennies = Improved running form and economy, endurance, mind-body coordination, motivation, and fat-burning.

Link  —  Posted: May 23, 2014 in Fitness
Tags: , ,

ING NYC Marathon

Reposted from: http://dailyburn.com/life/fitness/running-marathon-training-tips/

In high school, I could barely run the timed mile test, walking most of it.

Three years ago, I ran my first marathon after losing 50 pounds. I finished in 4:59, and I was happy just to have finished. But I knew I had more in me.

A few weeks ago, I ran my fourth marathon in 3:56. I took more than an hour off my time in three years, without devoting my entire life to running. I work a full-time job, volunteer and have an active social life, but I never felt like I was giving anything up for running. If anything, it added to the quality of my life.

I trained hard to get there, but there are also a few important tweaks I made that helped. Of course, the marathon is a special beast, and anything can happen on race day. But most coaches agree that training smarter physically and mentally can get you to the starting line stronger and ready to tackle 26.2. Here are five strategies that can be effective across the board, along with insights from Bart Yasso, Chief Running Officer of Runner’s World.

1. Add Speedwork

When I started training for my first marathon, I was still pretty new to running. I’d been at it for about a year, and the thought of intentionally running faster sounded terrifying. I just wanted to finish. During subsequent training cycles, I learned that speedwork (pushing harder in the middle of a workout at a specific speed for a specific amount of time) would change everything. That’s right, running faster… helps you get faster. Crazy, right? Speedwork works best when you’re running hard at a distance relative to your race distance, so tempo runs or mile repeats are best for marathoners. “I always felt like I was getting a little bit of speed but lots of endurance from mile repeats,” says Yasso.

2. Log Race Pace Miles

How are you going to run your goal pace for hours on end if you don’t know what it feels like to run at that pace? Speedwork paces and goal race paces should be fairly different. Your speedwork pace is typically your pace for a 10K or a half-marathon, or, a pace you can hold for roughly one to two hours. Your race pace is something that you’re trying to hold for 3-plus hours, unless you’re an elite athlete.

I practiced at my goal pace for mid-distance runs and at the end of long runs, so that I knew what it felt like to hold it for a sustained amount of time, and what it felt like to hold it on tired legs. On race day, while I checked my watch obsessively, I easily could have told you if I were running faster or slower than my goal pace by how I felt the cadence in my legs. By running race pace miles, says Yasso, “I always felt that innate sense of rhythm that I can carry this pace on race day.”

3. Up Your Days and Your Mileage

The first time around, I ran between two and three times per week, supplementing that with other forms of cardio at the gym and lifting with a trainer. I finished that marathon at an 11:25 pace, hitting the wall colossally at mile 18. I knew if I wanted to get faster, though, that I would need to run more. I used to be terrified of running two days in a row, but this year I typically ran five days per week, and I maxed out my mileage at 47 miles one week. I got to run on tired legs quite often, which was a huge mental boost at mile 22 of the marathon, when my legs felt like someone had strapped massive sandbags to them.

Though there are many variables to determining weekly mileage, says Yasso, the key is to listen to your body and not overtrain. Experts generally recommend not increasing your weekly mileage more than 10 percent each week.

4. Get Comfortable Being Uncomfortable

Running is hard. Running fast(er) is even harder. Miles 21 to 24 of the New York City Marathon were incredibly uncomfortable. Of course they were. I’d just run 20 miles! I reminded myself it was supposed to be uncomfortable and not to walk.

“The only way to advance in our sport,” says Yasso, “is to go to the uncomfortable zone. Embrace the pain, and you will be rewarded at the finish line.”

5. Never Set Limits

I took off 40 minutes between marathons 1 and 2. If I had believed that was impossible, I wouldn’t have had the guts to go for that time and make gutsier goals from there. But I thought about what I could do and shot high. I missed the mark last year, but if I hadn’t set such an audacious goal, it wouldn’t have lit the fire in my belly to chase the 3:56 this year.

Tips for Running in Humidity

Posted: August 22, 2013 in Fitness
Tags: , ,

It’s not (just) the heat that matters! How to cope with the muggy weather.

Image by        


       Published        

July 10, 2013

Mind Body Aug 2013

Runners often obsess over weather reports, tracking the coolest time of day in which to run. But as anyone who’s ever tried to finish a five-miler in steamy conditions knows, it’s not just the temperature that matters, it’s the humidity.
“Of all the climate measurements we take to assess heat risk for our runners, humidity is the biggest factor,” says George Chiampas, D.O., the medical director of the Chicago Marathon. Humidity makes warm summer runs even more taxing because the higher the moisture content of the air, the hotter it feels. An 88-degree day with a relative humidity just under 40 percent, for example, will feel like 88 degrees. Hot, yes, but when humidity reaches 70 percent, that same 88 temperature feels like 100 degrees.
Unless you’re lucky enough to live in Paradise, Nevada—the least humid city in the U.S.—here’s how to cope when running in steamy conditions.
Why Humidity Matters When you run, your core body temperature naturally rises, and your sweat glands produce droplets that carry excess heat to the surface of the skin, where it evaporates. But humidity prevents sweat from evaporating, so the heat stays put. “On a hot, humid day with no breeze, you have lost a key way to get rid of your building body heat, which can make running dangerous,” says Michael Bergeron, Ph.D., a professor at the Sanford School of Medicine of the University of South Dakota.
If your body heats up and gets more and more dehydrated, it goes into survival mode, maintaining blood flow to your essential organs (to keep you alive) and to your skin (to regulate temperature). Less blood will flow to your GI tract, which will make the digestion of sports drinks or gels difficult, and you may feel nauseous as a result. You may also find you are more prone to side stitches when you are overheated—especially if your breathing becomes shallow and uneven. And your heart rate will escalate as your ticker and lungs work overtime trying to deliver oxygen throughout your body, Dr. Chiampas says.
But wait, there’s (ugh!) more. If you continue to gut it out, your brain temperature will rise, which makes matters worse: Your ability to assess your own body temperature will become difficult (runners often report feeling chilled or goosebumpy when they’re overheating). You can also start to lose control over body mechanics (your form and footing will get sloppy), and your mental abilities may start to break down (you may feel dizzy or disoriented).
“Your temperature can spike in minutes,” Bergeron says. “If you’re running a 5-K or a 10-K on a hot day, you can jack up your body temperature quickly.” Also, it’s a myth that newbies or not-fit-enough runners are the ones who suffer in hot, humid conditions. In fact, competitive athletes may be more prone to heat-related illnesses because the faster you run, the more body heat you generate. “As humidity increases, thermal strain and premature fatigue increase exponentially, and so running at your normal pace will feel very difficult,” Dr. Chiampas says. It’s also important to recognize that feeling sluggish on a sticky day doesn’t indicate a lack of fitness or a lapse in mental toughness—it’s your body’s physical response to a stressful environment.
Of course, some people handle heat and humidity better than others. Body size is one factor—the more body mass you have, the more insulation and load you carry and the more heat your body generates, which makes it easier for you to overheat. Age is another variable—over time, your body becomes less adaptable to heat; age-related changes to sweat glands can decrease sweat production and reduce the body’s ability to cool itself effectively. Also, sweat content varies: Some people lose more sodium in their perspiration than others, and that can impact performance and increase risk of cramps if these salty sweaters don’t take in enough electrolytes. Where you live also plays a role: It takes generally 10 to 14 days to acclimatize to hot and humid conditions. People who train in humid parts of the country will become naturally used to muggy conditions and probably fare better at, say, an August East-Coast race than someone who travels in from the West Coast, where humidity is generally lower.
Slogging On You might think the best times to run are early morning or evening, or cloudy, rainy, or not-crazy-hot days. But all of those can be incredibly humid. When you check the weather report, don’t pay attention to just the temperature. The Heat Index combines temperature with relative humidity to give you apparent temperature—how it actually feels outside. Relative humidity doesn’t become a factor until it reaches about 40 percent—below that, you’ll have a comfortable run; above that, it could impact your performance. For example, a 75-degree day with zero percent humidity will feel like 69 degrees. But in 100-percent humidity, 75 degrees will feel like 80. (Though there is no simple formula for calculating Heat Index on your own, it’s easy to find on weather Web sites and apps.) The National Weather Service issues a Heat Advisory when the Index is expected to exceed 105 for at least two consecutive days.
In those conditions, if you are intent on getting in a quality workout, your best bet is a treadmill in an air-conditioned room. Otherwise, opt for a shaded path (versus heat-absorbing roads), run close to water (bodies of water offer breezier conditions), and take walk breaks. It’s essential to hydrate properly and let go of any time-based goals—run by feel instead of pace. When temperatures go from 75 to 90 degrees, heart rate can increase by 10 to 20 beats per minute, which will make your perceived effort much greater. Add humidity to the mix, and the effect will be even more significant, Bergeron says.
Be mindful of the early warning signs of heat exhaustion and heat stroke: fatigue, nausea, dizziness, headaches, tingly skin, and confusion. Call it quits if you experience any of them—even if you haven’t reached the end of your run or the finish line yet.
The good news? You can teach your body to respond more efficiently in the heat. Signing up for a race in the second half of the summer will give you a few weeks of heat training under your fuel belt, so you’ll struggle less than you would at the beginning of the season. And any training you do now will only make your fall runs all the more enjoyable.